A Symphony of Ingredients: The Chocolate Cake Dream Team
Alright, let’s talk about the heroes of our chocolate cake saga—the ingredients! I mean, who knew flour, sugar, and cocoa could throw such a fabulous party? Each one plays a vital role in creating that dreamy, rich cake we all crave. So, let’s break it down, shall we?
- All-Purpose Flour: This is the backbone of our cake, giving it structure and that delightful crumb. You could say it’s like the reliable friend who always shows up with snacks. Just don’t overmix it, or you’ll end up with a tough cake. Nobody wants that!
- Cocoa Powder: Now, here’s where the magic happens. Cocoa powder is what gives our cake its deep, chocolatey flavor. I like to use unsweetened cocoa for that intense richness. It’s like the dramatic one in the group who adds all the flavor!
- Sugar: Ah, sugar—the sweet talker of the bunch. It not only sweetens things up but also helps with moisture. Plus, it’s always fun to watch it dissolve into the batter, like a magician at work. Just make sure to use granulated sugar; we want that smooth texture, not a gritty experience!
- Baking Powder and Baking Soda: These little guys are the cheerleaders of our cake, making it rise and get that fluffy texture we adore. It’s all about the right balance, so don’t skip them unless you want a pancake instead of a cake!
- Eggs: Eggs are like the glue in this situation. They bind everything together and add richness. Plus, they help with moisture. If you ever find yourself cracking an egg and thinking about how it’s basically nature’s little package of protein, you’re not alone!
- Buttermilk: Oh, buttermilk, you glorious ingredient! It adds a tangy flavor and makes our cake super moist. You could use regular milk, but I promise buttermilk takes it to another level—like a secret handshake among ingredients.
- Vanilla Extract: This isn’t just an afterthought; vanilla is the finishing touch that brings all the flavors together. Think of it like the background music in a movie—it sets the mood without stealing the spotlight.
- Butter: Last but definitely not least, butter! It adds richness and flavor that’s hard to beat. Just make sure it’s softened to room temp so it blends in smoothly, or you’ll be wrestling with lumps. Nobody wants that kind of workout!
So, there you have it! Each ingredient plays a specific role, and together they create this fantastic chocolate cake that’ll make your taste buds dance. It’s a team effort, and I can’t wait for you to bring it all together!
Whisking for Wonder: The Alchemy of Mixing
Alright, let’s talk about one of the most magical steps in baking: whisking! It might not sound like a big deal, but trust me, this is where the real alchemy happens. When you whisk, you’re not just stirring ingredients together; you’re creating a whole vibe for your cake. It’s like giving your batter a pep talk before the big show!
First off, let’s get into the nitty-gritty of what happens when you whisk. You’re incorporating air into your mixture, and that’s crucial for achieving that light, fluffy texture we all dream about in a chocolate cake. If you don’t whisk enough, you might end up with a dense, sad cake that even your dog wouldn’t want to eat. (No offense to your dog, but we all know they’ll eat just about anything!)
When you’re mixing your dry ingredients, like flour and cocoa powder, make sure you’re using a whisk and not just a spoon. Whisks are like tiny, magical wands that do a great job of breaking up lumps. If you’ve ever bitten into a chocolate cake and found a flour clump, you know exactly what I’m talking about. Yikes!
Now, when you move on to the wet ingredients, it’s time to channel your inner mad scientist! Start with the eggs and sugar, and whisk them together until they’re nice and frothy. This is where the real transformation begins. Add in your melted chocolate and butter mixture, and keep whisking until everything’s combined. It’s like the ingredients are having a dance party in your bowl, and you’re the DJ! Keep that rhythm going, and you’ll have a batter that’s ready to party in the oven.
Don’t forget about the folding part, too. When you mix your dry and wet ingredients together, use a spatula to gently fold them in. Think of it like giving your batter a big hug instead of a rough shove. You want to keep that air in there! If you go all Hulk on it, you’ll deflate all your hard work, and nobody wants that.
- Whisking adds air for fluffiness
- Use a whisk for dry ingredients to break lumps
- Whisk eggs and sugar until frothy for that magic
- Gently fold wet and dry ingredients to keep the air in
So, next time you’re whisking away, remember that this step isn’t just a formality. It’s a chance to infuse your batter with love and air, setting the stage for a chocolate cake that’ll knock everyone’s socks off. And who doesn’t want to be the sock-knocker-offer at the next gathering? Happy baking!
The Sweet Science of Baking: From Oven to Perfection
Baking is kinda like magic, don’t you think? You throw some ingredients together, mix ’em up, and then—bam!—you’ve got something delicious. But, let’s be real, it’s not just about tossing flour and sugar in a bowl and hoping for the best. There’s a bit of science involved, and that’s where it gets interesting.
First off, the temperature is key. It’s like that Goldilocks story—everything needs to be just right. Too hot, and your cake could turn into a dry brick (yikes!). Too cold, and it’s like the cake just refuses to rise. It’s like that friend who always shows up late to the party. You’re just waiting and waiting, and *nothing* happens. So, make sure your oven’s preheated before you dive into mixing those ingredients.
Speaking of ingredients, don’t underestimate their power. Each one plays a role in the final product. Flour gives structure, sugar adds sweetness (duh!), and eggs? They’re the glue that keeps it all together. Fun fact: if you’re ever in a bind, you can actually use applesauce as a substitute for eggs in some recipes. Who knew healthy could be delicious?
- Measuring: Seriously, measure those ingredients. Baking is a science, and precision counts. Remember the time I eyeballed the sugar and ended up with a cake that was basically candy? Lesson learned!
- Mixing: Don’t overmix your batter! It’s tempting to keep stirring until everything’s perfectly smooth, but that can lead to a tough cake. Think gentle folding, like you’re cradling a baby bird. Okay, maybe not that delicate, but you get the point.
- Cooling: Patience is a virtue, my friend. Once your cake is out of the oven, let it cool before frosting. I know it’s hard to resist, but trust me, a melted frosting disaster is *not* what you want.
And hey, if things go a little sideways—don’t sweat it! Every baker has had a flop or two. It’s all part of the journey. Just remember, even the best bakers had to learn somewhere. So, roll up those sleeves, crank up the oven, and let’s get to baking this decadent chocolate cake that’s sure to impress!
Decadence on a Plate: The Art of Presentation and Indulgence
Alright, let’s talk about the part that really gets everyone drooling—presentation! I mean, you could have the most delicious chocolate cake out there, but if it looks like a hot mess on the plate, people might be a little hesitant to dive in. It’s all about that first impression, right? We eat with our eyes first, so let’s make it count!
Now, when you’re plating up your cake, think of it as a canvas. You’re the artist, and the chocolate cake is your masterpiece. A simple yet elegant way to present it is to use a cake stand. Seriously, if you don’t have one, just get one. It elevates everything—literally! Plus, it makes you feel fancy, like you’re hosting a tea party with the Queen or something. Just don’t forget the crumpets.
- Layer it up: If you’ve made a layered cake, showing those beautiful layers can be a game changer. A clean cut through the middle reveals all that gooey chocolate goodness. Don’t be shy about showing off!
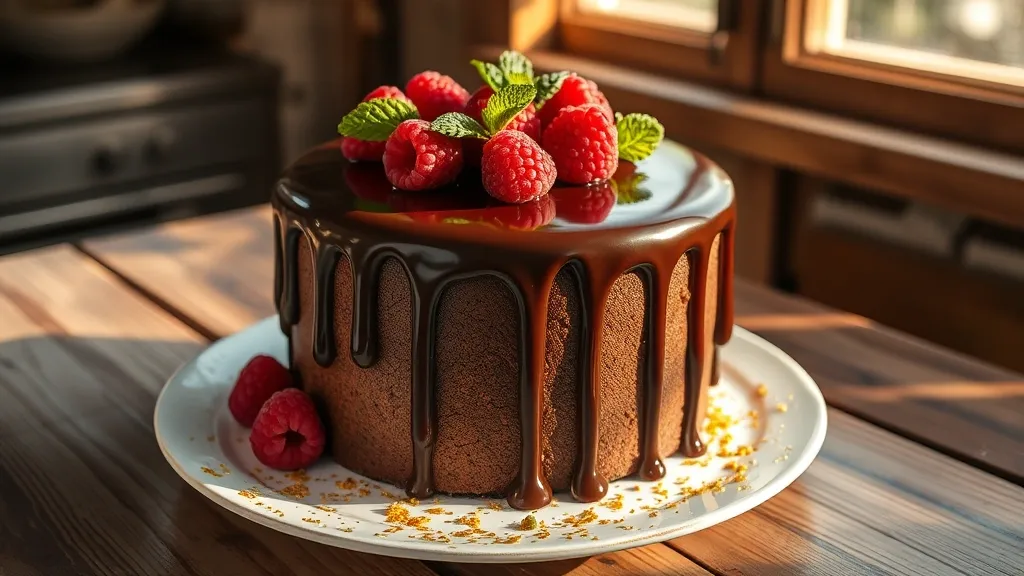
- Drizzle, drizzle, drizzle: A little chocolate ganache drizzled over the top is like the icing on the cake—oh wait, it is the icing! Get creative with your drizzles; maybe even a bit of caramel or white chocolate for contrast. You can channel your inner Jackson Pollock here, but maybe don’t go too wild unless you’re aiming for abstract art.
- Garnish with flair: Fresh berries, mint leaves, or even a dusting of powdered sugar can elevate your cake from “meh” to “wow!” Plus, it adds a pop of color, which is always nice. You want your cake to look like it’s ready for a photo shoot, not like it just rolled out of bed.
And let’s not forget about indulgence. This cake is meant to be a treat, so don’t hold back! Serve it with a scoop of vanilla ice cream or a dollop of whipped cream. The more, the merrier, right? If you’re feeling bold, throw some chocolate shavings on top. You can never have too much chocolate, in my opinion.
In the end, making your chocolate cake look as good as it tastes is all about having fun and letting your personality shine through. So grab those sprinkles, get creative, and let’s make some dessert magic happen!