The Zesty Origins: Where Citrus Meets Crust
Alright, let’s take a little trip down memory lane, shall we? Key lime pie isn’t just a dessert; it’s like a slice of Florida sunshine on a plate. The whole thing started way back in the late 19th century in the Florida Keys, where the tiny Key lime (yeah, that’s the little green one) was all the rage. I mean, who knew a little fruit could pack such a punch, right?
So, picture this: early settlers and fishermen enjoying their catch of the day, and then, bam! They’re inspired by these bright, zesty limes growing in their backyards. They probably thought, “Hey, we should totally whip up something sweet with these!” And thus, the key lime pie was born. It’s like a culinary love story, but with more zest and less drama.
Now, let’s chat about the crust. Originally, folks used a simple cracker crust, which is super easy to whip up. And let’s be real, who doesn’t love a good graham cracker crust? It’s like the perfect partner for that tangy filling. You’ve got the crunch, the sweetness, and it just holds everything together like a good friend at a party. Plus, it’s super forgiving if you accidentally break a few crackers—no judgment here!
- Key Limes: These little beauties are the star of the show. They’re smaller and have a unique tartness that makes the pie sing.
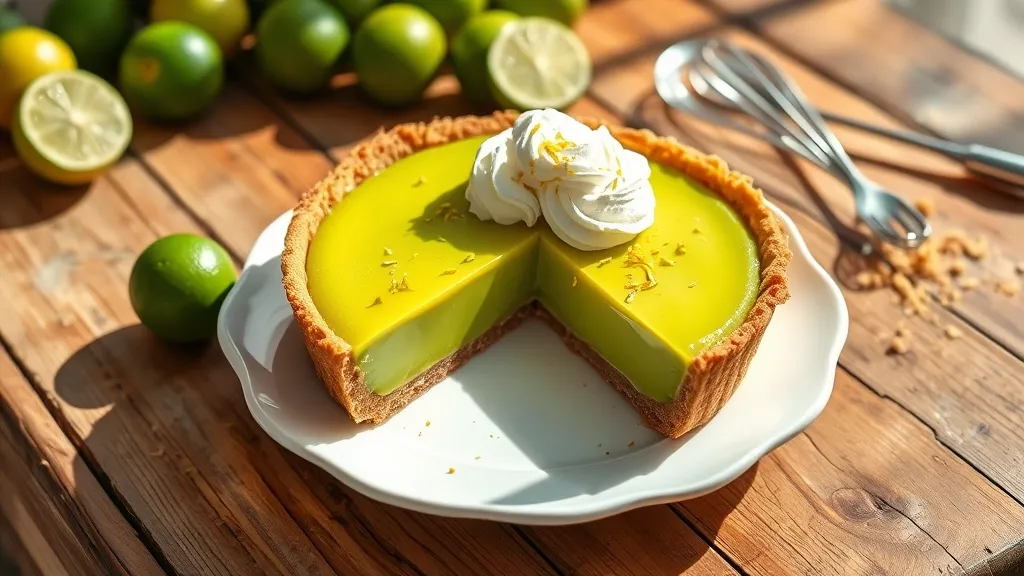
- Crust: A classic graham cracker crust is the traditional choice, but some folks get creative with different types of cookies or even pastry.
- Whipped Cream: You can’t forget the dollop on top! It’s like the cherry on top, but way better.
As time went on, the pie became a staple in Florida, and it’s now a beloved treat nationwide. I mean, who wouldn’t want to enjoy a slice of this creamy, citrusy goodness? It’s like summer in every bite, even if you’re stuck in the middle of winter, dreaming of palm trees and beach vibes. Honestly, if you haven’t had key lime pie yet, what are you doing with your life?
So, whether you’re making it for a special occasion or just because it’s a Tuesday and you deserve a treat (you totally do!), key lime pie is always a good idea. Let’s dive into the recipe and bring a little sunshine into your kitchen!
The Perfect Balance: Mastering the Filling
Alright, let’s talk about the filling. This is where the magic happens, and honestly, it’s like the heart and soul of your key lime pie. You want that perfect blend of sweet and tart, where your taste buds do a little happy dance. Seriously, if you nail this part, you’re basically a dessert magician.
First things first, you need to gather your ingredients. Key limes, of course, are the star of the show. If you can’t find them, don’t stress too much; regular limes work in a pinch, but there’s just something about key limes that adds that extra zing. It’s like trying to replace chocolate with carob—just no. You can also grab some sweetened condensed milk and egg yolks. Yep, that’s pretty much it! Simple, right?
Now, when you start mixing things together, this is where it gets fun. You wanna whisk those egg yolks until they’re all nice and frothy. It’s kinda like giving them a little spa day. Then, add the sweetened condensed milk and whisk some more. I mean, who doesn’t love the creamy goodness of condensed milk? It’s like liquid happiness!
After that, it’s time to squeeze in the lime juice. Here’s a pro tip: roll those limes on the counter before cutting them. It’ll help you get more juice outta them. And don’t forget to zest a lime or two; it adds a lovely depth of flavor. Honestly, zesting is not as scary as it sounds, and it makes you feel all chef-like.
Once everything’s mixed, you’ve gotta taste it. Yes, I said it! Don’t just trust the recipe; you’ve gotta make sure it’s balanced. If it’s too tart, throw in a smidge more sweetened condensed milk. Too sweet? A little more lime juice should do the trick. It’s all about finding that sweet spot where your filling is just right.
Then, pour that luscious mixture into your pie crust. I like to use a graham cracker crust because, let’s be honest, it’s the classic choice and it’s so easy to whip up. Pop it in the oven, and while it bakes, take a moment to daydream about how amazing it’s gonna taste. Seriously, it’s like a mini-vacation for your taste buds.
Let it cool, and then chill it in the fridge for a few hours. Patience is key here, folks! The longer it chills, the better the flavors meld together. Trust me, it’s worth the wait. Once you serve it up, don’t forget the whipped cream on top—it’s the cherry on the sundae! Or, um, the whipped cream on the key lime pie? You get the idea.
So there you have it, folks! Mastering the filling is all about balance, and with a little practice, you’ll be the proud owner of a key lime pie that’s bursting with flavor and sunshine in every bite.
Crust Crafting: A Hug for Your Pie
Alright, let’s talk about the pie crust. You know, that crispy, buttery shell that cradles all that tangy goodness inside? It’s like the warm hug your pie deserves. A great crust can totally make or break your key lime pie. Trust me, I’ve had my fair share of “meh” crusts that left me feeling more sad than satisfied.
Now, you could go the store-bought route, and honestly, no judgment here. Sometimes life gets busy, and we just wanna get to the good stuff. But if you’re feeling adventurous, making your own crust is easier than you might think. Plus, it’s a great way to impress your friends. Just imagine them biting into your pie and going, “Wow, did you make this crust from scratch?” You’ll feel like a baking rockstar!
So, what’s the key to a perfect crust? It starts with the right ingredients. You’ll need some graham crackers (the classic choice), butter, and a sprinkle of sugar. I like to use a bit of brown sugar for that extra depth of flavor. It’s like giving your crust a little personality. And if you’re feeling fancy, throw in some crushed pecans or coconut flakes. Just be careful not to go too wild or your crust might end up tasting like a tropical smoothie gone wrong.
- Graham Crackers: The base of our crust, obviously. Crush ’em up until they’re fine crumbs. You want a nice texture that holds together but isn’t too gritty.
- Butter: Always unsalted. This is where the richness comes from, so don’t skimp on it!
- Sugar: Just a touch to sweeten things up. Remember, you can always add, but you can’t take away.
Once you’ve got your ingredients mixed up, it’s time to press the mixture into a pie dish. You want it to be even and firm, so it holds up when you pour in that luscious key lime filling. Pro tip: use the bottom of a measuring cup to really pack it down. It’s like a mini workout for your arms, and who doesn’t want a little exercise while baking?
After you’ve shaped your crust, pop it in the oven for about 10 minutes. This little step helps it set and gives it that golden brown color. Just keep an eye on it—nobody wants a burnt crust ruining their pie party!
And there you have it! A crust that’s not just a vessel for your filling but a delightful part of the whole pie experience. Next time you serve it up, just remember, you’re not just giving them a slice of key lime pie; you’re handing out hugs in pie form. Now, isn’t that sweet?
Serving Sunshine: Garnishes that Dazzle
Alright, so you’ve baked this amazing key lime pie, and it’s looking all kinds of delicious. But wait! Before you dive in, let’s talk about garnishes. They’re like the cherry on top, but way cooler. Seriously, adding a little flair to your pie can really elevate it from “yum” to “WOW!”
First up, let’s chat about whipped cream. It’s classic for a reason, folks. Just a dollop (or a mountain, no judgment here) of freshly whipped cream can make your pie look like it belongs in a magazine. Plus, that creamy texture pairs so well with the tangy lime filling. It’s the yin to your pie’s yang, you know?
- Fresh Lime Zest: This one’s super easy. Just grab a zester and go to town on a lime. Sprinkle that green gold over the top of your pie, and it adds a pop of color and a little zing. It’s like giving your pie a little sun-kissed makeover.
- Key Lime Slices: For a more rustic vibe, slice up some key limes and arrange them on top. They’re cute and definitely add to the whole tropical feel. Plus, they work like a charm if you wanna show off your fruit-cutting skills. (Just don’t cut your finger; that’s a whole different kind of garnish.)
- Toasted Coconut: If you’re feeling a little adventurous, sprinkle some toasted coconut flakes on top. They add a nice crunch and a hint of sweetness that pairs really well with the pie. Just be sure to watch them while toasting; they can go from golden to burnt in a heartbeat, and nobody wants that!
And hey, if you’re into a bit of chocolate (who isn’t, right?), drizzling some chocolate sauce or adding mini chocolate chips can create a decadent twist. It’s like you’re taking a classic and giving it a fun little spin. Just don’t go overboard, or you might lose that lovely key lime flavor.
Finally, don’t forget about the presentation. Serve your pie on a colorful plate, maybe with a cute fork on the side. It’s all about creating that Instagram-worthy moment! And let’s be real, who doesn’t want their dessert to be the star of the show?
So there you have it! A few simple garnishes that can take your key lime pie to the next level. Now, go get your garnish game on and serve some sunshine on a plate!